|
With a pair of scissors and your imagination, you can turn plastic
soda bottles into tools for exploring the world.
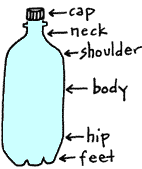
| Anatomy: The first
step in any construction project is to understand your materials.
Almost all soda bottles taper at the shoulder
and hip. Because of this shape, you can “nest” the tapered
ends inside the straight sides of another bottle.
|
 |
| |
Top
of page |
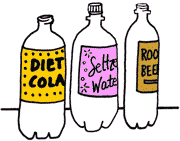
| Species: Not all bottles
are exactly the same. Some have thinner, gently tapering bodies,
while others are wider with rounder shoulders. Bottles that
appear the same may vary by a millimeter or two in diameter
and this can make a difference. These differences will affect
how your bottle constructions fit together. When you are collecting
bottles to construct the columns, look for bottles with similar
shapes and sizes. One way to guarantee this is to use bottles
of the same brand of beverage. Most bottles work equally well
in bottle biology constructions. Constructions can also utilize
additional common plastic containers such as deli containers,
cottage cheese dishes or other similar shaped plastic containers.
|
 |
| |
Top
of page |
| Bottle care: Creased
and bent bottles have weak spots. Use bottles without dents
so your columns are strong and durable. Also, remember that
air expands and contracts with temperature changes. If you carry
sealed bottles from a warm room to a cold car, your bottles
will crumple. When transporting bottles, keep the caps off or
loosely attached to allow air exchange. |
|
| |
Top
of page |
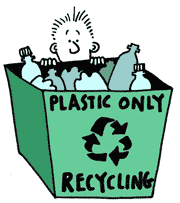
| Collecting bottles:
For better or for worse, plastic soda bottles are not difficult
to come by. If your plans involve many bottles, however, you
may need to organize some type of bottle collection activity.
Ask students to bring in bottles. Some teachers use extra credit
points or other incentives to encourage students to contribute
bottles. Your community recycling center is also an excellent
source. |
 |
| |
Top
of page |
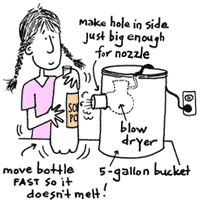
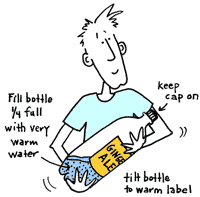
| Removing labels:
Once you have collected bottles, you will need to remove the
labels. Most labels are attached by a heat-sensitive glue.
Resist ripping off the labels, or you
may end up with many small pieces of label stuck to the bottle.
An inexpensive hair dryer will
remove the label and base from your bottle in a jiffy. Set
the hair dryer on low. Hold your
bottle about 10 cm away from a blowing nozzle, and move it
rapidly up and down so that the air warms the seam of the
label. Gently pull on an edge of the label until you feel
the glue begin to give. This takes about
4 seconds.
Bottles are made from PETE (polyethylene
teraphthalate). This is a generally inert plastic, but it
will warp easily if overheated, so keep the bottle moving.
Leave the bottle cap on or fill the bottle with water first
to prevent warping.
A quieter way to remove the label and base from your bottle
is to fill it about 1/4 full with very
warm water (49 - 65 degrees C or
120 - 150 degrees F; hotter than this may warp your bottle).
Cap the bottle in order to retain pressure inside so the bottle
doesn't crumple, and tip it on its side to warm the glued
seam. After a few seconds tug on a label corner.
Glue is often left on the bottle
after the label is removed. If this offends your aesthetic
sensibilities, rub a small amount of peanut butter onto the
glue. As you rub, the oil in the peanut butter causes the
glue to ball up so it can be pulled off (no kidding, crunchy
works best). If you are really into the clean bottle look,
wash your bottles with soap and warm water and dry them –
they'll shine!
|
 |
| |
Top
of page |
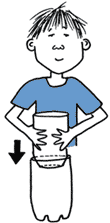
Cutting bottles: There
are only so many ways you can cut
a bottle; above the shoulder, below the shoulder, above
the hip and below the hip, and only so many things you can
do with each piece you create.
The easiest way to cut a bottle is to cut along a marked
line with scissors. Once you have decided where to cut a bottle,
place it on its side in the corner of an empty drawer, tray,
or box — shallow cardboard flats and computer printer
paper box tops work well. Brace the bottom of the bottle against
a corner of the box. Rest a pen or wax pencil against the
edge of the box, so the tip rests against the bottle where
you want your cutting line. Slowly turn the bottle. Two people
make this job easy.
We use erasable felt tip pens or
wax pencils to make cutting lines because they don't smear
and can be easily removed. Make sure your bottle is dry before
marking. If you want lines that last, use a permanent marker.
Draw all of your cutting lines first
(it's hard to do once the bottles have been cut), and then
use a cutting blade to begin the bottle cuts. You only need
a cut big enough to insert the top arm of a scissors. You
will make a smoother cut with the top arm of the scissors
inside the bottle, so insert the top arm into your initial
cut and snip around, following your cutting line. Don't worry
about ragged edges; they are easy to snip away with scissors
once the bottle is in pieces.
Basic bottle cuts... |
 |
| |
Top
of page |
Building Blocks*:
Step-by-step bottle constructions
specific to each Column Investigation. Bottle Biology investigations
can and should go beyond this book. Just like Legos™
or Tinker Toys™, Bottle Biology Building Blocks can
be combined in an infinite variety of ways. Each possible
combination is helpful for exploring different concepts.
*Building Blocks concept has been adapted
from the Families Understanding Nature Project (F.U.N.) by
Heather Putnam, 2002 |
|
| |
Top
of page |
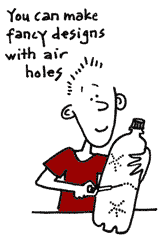
| Making holes: The
size, shape and number of air holes you put in a bottle column
is part of your experiment – there's no wrong way to
do it. Keep in mind, however, that with the Decomposition
Columns, you will most likely want holes small enough to keep
fruit flies and other insects inside the bottle and out of
your classroom. You will want adequate ventilation for plants,
insects and other life, so make four or five "stars" of holes
(see picture) – but keep them small.
A poke
is a needle, pin, or nail, with the blunt end stuck into a
wooden handle. Diaper pins, safety pins,
upholstery needles and compass points all work as well.
For needle pokes, you needn't cut off the eye of the needle.
For large nail poke handles, you may want to use a small dowel,
and will need to drill a hole just a bit smaller than the
nail into one end of the dowel in which to insert the cut
end of the nail.
Hot pokes or soldering irons are
useful for creating larger holes or making holes near the
neck or base of the bottle where the plastic is thicker. Very
large holes can be made by heating the open end of a pyrex
test tube in a gas torch or Bunsen burner and pushing the
tube through the bottle. Obviously, burns are a hazard of
this technique. Also, plastic smokes a bit as it melts, so
an entire class using hot pokes can create a real stink. Be
sure you let the pokes cool off in a safe place. |
 |
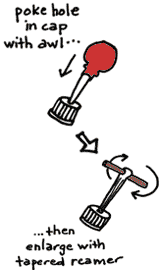
A woodworking
awl is quite effective at making small holes in
bottles and bottle caps. If an awl is pushed all the way through
a surface, it will create a hole several millimeters wide,
enough for fruit flies to pass through. Awls are particularly
sharp, so place a piece of wood underneath whatever you are
poking and watch your fingers.
A tapered
reamer, available at the hardware store, is excellent
for enlarging holes. Normally used for creating holes in sheet
metal, it will easily make a hole in plastic up to 1 cm in
diameter. Since the reamer has a blunt tip, begin your hole
with an awl or poke.
A paper
punch will easily penetrate a soda bottle or film
can. Different punches create different sized and shaped holes.
Since the holes are quite large, punches are not recommended
for investigations that you want to keep moisture or small
insects from either entering or existing the investigation.
If you are preparing materials for many students, a drill
press is the most efficient tool if you have access
to one. Regular spiral fluted drill bits work well, and sharp
"brad" pointed bits will wander less on the surface of the
plastic as you start your hole. For holes larger than 1 cm,
flat wood bits with spurs on the blade tips work best.
Pieces of old hosiery or no-see-um tent netting, plastic
window screening or nylon bridal veil material will keep out
even the smallest flies and can be used to cover window bottles.
Use double-sided sticky tape to attach netting by surrounding
the hole with tape and pressing on an appropriately sized
piece of netting. Alternately, 5-minute epoxy glues work well.
|
 |
| |
Top
of page |
Joining bottles: Tape
is the best material for joining bottles and will help columns
survive handling in the classroom. However, not all tape is
created equal.
Tapes that are clear, waterproof,
and wide (about 5 cm) work well. For a large number of constructions,
you may want to buy a dispenser. The best tape we have used
(and the most expensive) is bookbinding
tape. We use it for making demonstration constructions.
Silicone
sealant such as bathtub or aquarium sealant is
required for the Terraqua
Column to produce waterproof joints, since even a waterproof
tape will eventually leak. Silicone sets over a 24-hour period
and is slippery when fresh. Fix the joint to be sealed with
several small pieces of tape, which you can remove after the
seal has solidified. Buy your sealant in a tube with a nozzle
that you can fit as far into the joint as possible. This will
give you a strong and watertight seal. Be sure to keep the
silicone bead thin, 2-3 mm in diameter, so it sets in 24 hours.
Also note that the chemicals used in silicone sealant are
a health hazard. Use the stuff in a ventilated area. |
|
| |
Top
of page |
| Hanging Bottles: Hanging
bottles will have gravity working for you rather than against
you. By hanging your bottle investigations with nylon cording
or macrame string, each component is individually accessible,
securely threaded together and stabilized with cording. Once
the bottles are hanging
they will not fall over and they will take up less table space.
|
|
| |
Top
of page |
|
